Creating a window with action buttons ↩
This tutorial shows how to create a very simple tool with user interface using vanilla.
Introduction
The interface will consist of a floating window and two action buttons:
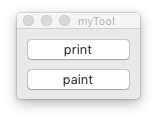
Each button in the tool will trigger a separate action:
- print the names of the selected glyphs
- apply a mark color to the selected glyphs
This example will illustrate the following common concepts and patterns:
Callbacks
A callback is a function that is called by another function which takes the first function as a parameter. Usually, a callback is a function that is called when an event happens.
In this example, the event will be the button clicks. Whenever the event is triggered, the dialog will call the function associated with it – the callback.
Callbacks are used extensively in vanilla and in user interfaces in general.
Defensive programming
The tool wants to do something to the selected glyphs in the current font. But what if there is no font open, or no glyph selected? The program should handle these situations elegantly, avoiding errors and providing informative messages to the user.
Notice how the program will exit the function if these two conditions (a font open, at least one glyph selected) are not met. Whenever that happens, a window will be opened with a message to the user.
Undo
If a tool makes changes to user data, it should also make it possible for the user to revert these changes if necessary.
In RoboFont, this is done by wrapping the action that alters the data in a with statement using the .undo() method on the object we are going to change, like
with glyph.undo("fixing left margin"):
    glyph.leftMargin = 10
or
with font.undo("updating font info"):
    font.info.copyright = "Copyright (c) 1532 Claude Garamond"
You can find another example of undo in the latest snippet of code of this article
Writing the code
We’ll write the code in 3 steps:
1. Creating the interface
We’ll start by creating the interface.
We define an object to represent the tool. When this object is initialized, it opens a floating window with the two buttons.
from vanilla import FloatingWindow, Button

class ToolDemo:

    def __init__(self):
        # create a floating window
        self.w = FloatingWindow((123, 70), "myTool")

        # define some layout variables
        x, y = 10, 10
        padding = 10
        buttonHeight = 20

        # add button for printing selected glyphs
        self.w.printButton = Button(
                (x, y, -padding, buttonHeight), # position & size
                "print") # button label

        # increase the y-position
        y += buttonHeight + padding

        # add button for painting the selected glyphs
        self.w.paintButton = Button(
                (x, y, -padding, buttonHeight), # position & size
                "paint") # button label

        # done - open the window
        self.w.open()

# open the dialog
ToolDemo()
The
FloatingWindowis used to make the tool stay on top of the other windows. Vanilla includes other types of macOS windows, likeWindowandHUDFloatingWindow.See Apple’s Human Interface Guidelines for info on when to use which window.
2. Adding behavior to the interface
Now that the interface is in place, we can start adding behavior to it. This is done by adding callbacks to link each button click to a function.
The functions don’t do anything useful yet – we’ll develop them in the next section.
from vanilla import FloatingWindow, Button

class ToolDemo:

    def __init__(self):

        self.w = FloatingWindow((123, 70), "myTool")

        x, y = 10, 10
        padding = 10
        buttonHeight = 20

        self.w.printButton = Button(
                (x, y, -padding, buttonHeight),
                "print",
                # call this function when the button is clicked
                callback=self.printGlyphsCallback)

        y += buttonHeight + padding
        self.w.paintButton = Button(
                (x, y, -padding, buttonHeight),
                "paint",
                # call this function when the button is clicked
                callback=self.paintGlyphsCallback)

        self.w.open()

    # callbacks

    def printGlyphsCallback(self, sender):
        print('printing...')

    def paintGlyphsCallback(self, sender):
        print('painting...')

ToolDemo()
3. Filling in the callback functions
With interface and callbacks in place, we can now add code to perform the actual actions (printing glyph names and applying mark colors).
Some things to notice in this version of the code:
- Defensive programming
- The code in the callbacks use the ‘defensive approach’ described in the introduction: before applying the action, we make sure that there is a font open, and that at least one glyph is selected. If these conditions are not met, we show an informative message to the user and exit the function.
- Using a message window to show text
- In the previous version, the
printfunction was used to print some dummy text in the Output Window. In this version we’re showing text to the user using aMessagewindow. - Opening the dialog with OpenWindow
- This version makes use of
OpenWindowto open the dialog – this prevents it from being opened twice. We’re now also using a conditional check to open the dialog only if the script is executed as the main script – this allows us to use the script as a module and import the dialog from another file. - Documentation strings
-
Since this is the final version of the code, we’re adding documentation strings to the object and its methods. Docstrings are plain language descriptions about what a piece of code does. They are similar to comments; but unlike comments, they become attributes of the object they describe, and can be used in automated documentation systems.
Docstrings are not required for your program to work – but if you are planning to share your code with other developers, it is good practice to include them.
from vanilla import FloatingWindow, Button
from mojo.UI import Message
from mojo.roboFont import OpenWindow

class ToolDemo:

    def __init__(self):
        '''Initialize the dialog.'''

        self.w = FloatingWindow((123, 70), "myTool")

        x = y = padding = 10
        buttonHeight = 20

        self.w.printButton = Button(
            (x, y, -padding, buttonHeight),
            "print",
            callback=self.printGlyphsCallback)

        y += buttonHeight + padding

        self.w.paintButton = Button(
            (x, y, -padding, buttonHeight),
            "paint",
            callback=self.paintGlyphsCallback)

        self.w.open()

    def printGlyphsCallback(self, sender):
        '''Print the names of all selected glyphs.'''

        font = CurrentFont()

        if font is None:
            Message('no font open', title='myTool', informativeText='Please open a font first!')
            return

        if not len(font.selectedGlyphNames):
            Message('no glyphs selected', title='myTool', informativeText='Please select one or more glyphs first!')
            return

        for glyphName in font.selectedGlyphNames:
            print(glyphName)
        print()

    def paintGlyphsCallback(self, sender):
        '''Paint all selected glyphs.'''

        font = CurrentFont()

        if font is None:
            Message('no font open', title='myTool', informativeText='Please open a font first!')
            return

        if not len(font.selectedGlyphNames):
            Message('no glyphs selected', title='myTool', informativeText='Please select one or more glyphs first!')
            return

        for glyphName in font.selectedGlyphNames:
            with font[glyphName].undo('set mark color'):
                font[glyphName].markColor = 1, 0, 0, 0.35


if __name__ == '__main__':

    OpenWindow(ToolDemo)
In RoboFont 1.8, use:
glyph.markinstead ofglyph.markColorfont.selectioninstead offont.selectedGlyphNames